Building a Shopify store with one of the Best Shopify Page Builders feels fast until you need more control over templates, sections, or dynamic content. Custom Liquid is the Shopify templating language that powers theme code, snippets, variables, filters, and JSON templates, allowing you to change the storefront, tweak theme settings, and fix layout issues without rebuilding everything. If you want hands-on help, PagePilot's AI page builder shows live examples and editable Custom Liquid snippets so you can learn while you design and publish pages faster.
What Is Custom Liquid And How Does It Work In Shopify?
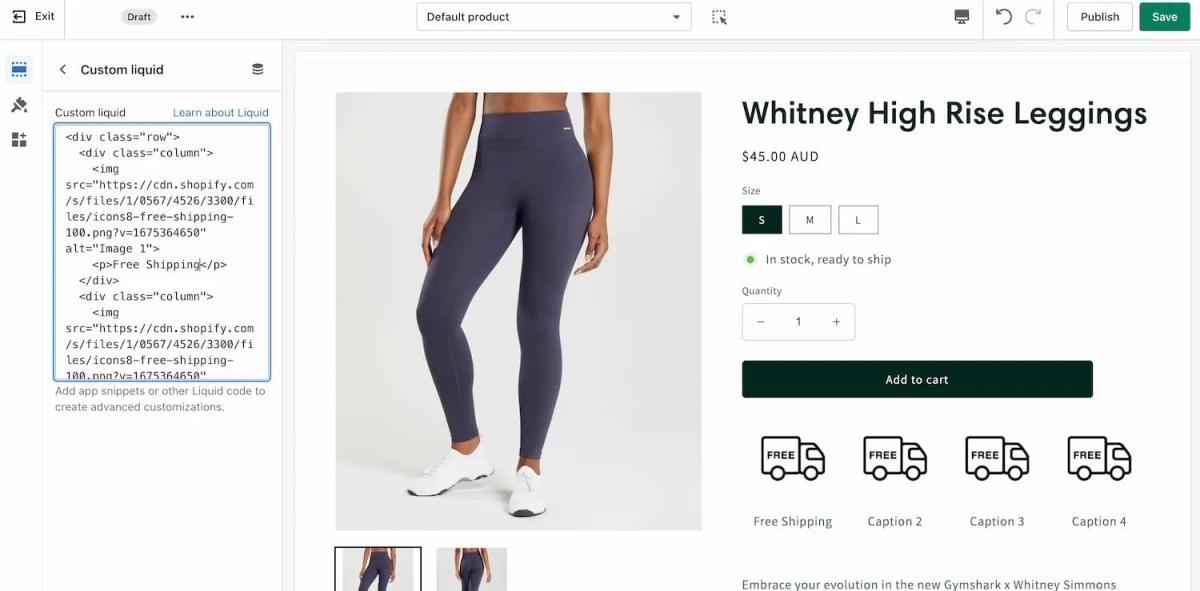
Custom Liquid is a theme editor block that lets you insert Liquid code directly into a page without editing theme files. It exposes the Liquid template language inside the visual editor so you can render dynamic content, use Liquid objects and filters, and apply conditional logic. You write the same Liquid expressions you would in a template, and the store renders them server-side when a visitor loads the page.
How Custom Liquid Runs Inside the Theme Editor
Custom Liquid executes as server-side Liquid when the storefront renders a page. The block has access to the standard Liquid objects like product, collection, cart, customer, and global shop settings. You can use tags, filters, loops, and variables to read and format data. The editor saves your snippet to the theme settings area rather than changing template files, so the actual JSON and Liquid files remain intact.
Common Liquid Objects and Filters You Can Use
Product, collection, cart, customer, shop, and routes are available as Liquid objects. Use filters like date, money, upcase, and truncate to format values. Access metafields with product.metafields.namespace.key or customer.metafields.namespace.key to show custom data. Use tag checks, for loops, and if statements for conditional content and repeated elements.
Practical Use Cases That Ship Quickly
Display a promo banner for products with a specific tag by checking product.tags. Show personalized copy only to logged-in customers by using the customer. Render extra product details from metafields without changing templates. Create collection-specific messaging by testing collection.handle or collection.id. These changes take effect immediately on the storefront once the editor saves the Custom Liquid block.
What Custom Liquid Can and Cannot Touch
You can read and render theme data and metafields, but you cannot add new server-side functionality or custom Liquid filters from within the block. You cannot install backend logic or modify app server behavior. Heavy loops or complex queries can slow rendering, so keep loops bounded and avoid rendering extensive collections in full.
Examples You Can Try Right Now
Show a metabfield string on a product page:
{{ product.metafields.specs.weight }}
Display a message only to logged-in customers:
{% if customer %}
Welcome back, {{ customer.first_name }}.
{% endif %}
Show a promotional line for tagged products:
{% if product.tags contains 'on-sale' %}
Special price today only.
{% endif %}
Loop a small related product list by handles:
{% assign handles = 'shirt-red,shirt-blue' | split: ',' %}
{% for handle in handles %}
{% assign p = all_products[handle] %}
{% if p %}
{{ p.title }} — {{ p.price | money }}
{% endif %}
{% endfor %}
Safety, Testing, and Performance Rules
Test changes in a theme preview and use a duplicate theme for experimentation. Keep loops and includes limited to avoid slow page loads. Do not expose private or sensitive data in the storefront. Comments in Liquid help you remember the purpose and limits of a snippet. If you need new filters or complex back-end features, build an app or edit theme files under version control.
How This Differs from Full Theme Development and Apps
Custom Liquid is a quick customization tool inside the editor. Theme development edits templates, sections, and assets, and gives you deeper control over structure and performance. Apps add server-side features or data processing that Liquid cannot perform. Use Custom Liquid for targeted display logic and small dynamic outputs, and use full development for layout changes or advanced integrations.
Troubleshooting Common Errors Fast
If your snippet shows raw code, check for unclosed tags. If variables return empty, verify object availability by printing their keys. Use the theme preview to replicate conditions like product context or logged-in customers. When performance drops, comment out loops and reintroduce them one by one to find the bottleneck.
Related Reading
- Does Shopify Host Websites
- Is It Worth Buying a Prebuilt Shopify Store
- How Much Does It Cost to Build a Shopify Website
- Shopify Product Page Customization
- How to Customize a Shopify Website
- Shopify Speed Optimization
What Are The Benefits of Custom Shopify Liquid?
Custom Liquid is Shopify Liquid code you add or edit to change how a store looks and behaves beyond the theme settings. It uses Liquid templates, tags, filters, objects, and variables to output dynamic content and control logic inside theme files, such as theme.liquid, section files, snippets, and template files. Developers and merchants use Custom Liquid to extend Shopify theme customization, tap into metafields, and create bespoke templates without installing extra apps.
Complete Design and Functional Control
Custom Liquid lets you add or rearrange sections and blocks, create custom product templates, and inject new UI elements where you need them. You can write Liquid code to surface specific product fields, pull collection data, and render components that match your brand rules, which gives you design control at the template level.
Boost Engagement with Personalised Dynamic Content
What you see in your store can change by using conditional logic and dynamic content. Show tailored messages for logged-in customers, surface location-specific shipping notices, or render product recommendations based on tags and metafields. This targeted approach increases relevance for shoppers and supports higher conversion rates when the right content appears to the right audience.
Make Updates Fast with Reusable Liquid Components
Reusable snippets and section templates mean one change updates many pages. Create a single snippet for a promotion banner or a shared product callout and include it across templates so edits are consistent and straightforward. That makes content management more efficient than repeatedly configuring apps or swapping multiple templates.
Build Features Without Slowing Your Store with Fewer Apps
Every app adds weight to page load time and can complicate maintenance. When you implement features with Custom Liquid, you reduce reliance on third-party apps and keep rendering inside the theme. You still use scripts selectively, but the core UI and content logic stay lean and native, which improves performance and lowers technical risk.
Lower Cost and Faster Experiments
Custom Liquid supports incremental development and rapid testing. Developers can push small template changes, tie fields to metafields for experimentation, and use theme version control or Shopify CLI for safe deployment. That reduces the need for large development projects or paid apps while letting you validate ideas quickly.
How Custom Liquid Fits with Shopify Development Workflows
Custom Liquid works with Online Store 2.0 patterns, theme sections, and app extensions when you need deeper integrations. Use the theme editor for visual tweaks and Liquid for structural or logic changes that the editor cannot expose. This combination keeps the store flexible and maintainable as you scale.
AI Page Builder for Fast Product Testing
PagePilot’s AI page builder will help you test product ideas and angles much faster. Give our AI a competitor or supplier URL, and we’ll create a high-converting product page using content found on that site. We'll then use our AI Product Image function to upgrade product visuals, ensuring you don't compete with the exact copy and images as your competitor. Start a Free Trial and generate 3 product pages for free today, no credit card needed.
How Can I Customize Liquid In My Shopify Theme?
Custom Liquid in Shopify lets you insert raw Liquid template language into a theme area so you can render dynamic content, use Liquid objects and filters, and combine HTML, CSS, and JavaScript for custom layouts. You can use Liquid to pull product data, collection lists, cart contents, metafields, or shop settings. Custom Liquid gives you that control while keeping changes inside the theme editor or a reusable section file.
Add Custom Liquid with the Built-In Custom Liquid Section
- Open the theme editor: Online Store > Themes > Customize on your active theme.
- Navigate to the page or template you want to edit.
- Click Add section and choose Custom Liquid.
- Paste your Liquid code into the editor field. This field accepts Liquid tags, objects, filters, and HTML. Example snippet to show a product title on a product template:
- {{ product.title }}
- Save and preview in the storefront. Use the preview switcher to check different templates and devices.
Create Your Own Custom Liquid Section When the Theme Lacks One
- Open theme code editor: Online Store > Themes > Actions > Edit code.
- Under Sections, click Add a new section and name it custom-liquid-section.liquid.
- Paste this starter code into the new file:
- {{ section.settings.custom_liquid }}{% schema %}{ "name": "Custom Liquid", "settings": [ { "type": "liquid", "id": "custom_liquid", "label": "Custom Liquid", "info": "Add app snippets or other liquid code to create advanced customizations." } ], "presets": [ { "name": "Custom Liquid" } ]}{% endschema %}
- Save the file. Return to Customize, add the new Custom Liquid section where you want it, then open the section and paste your Liquid code into its settings. Save again and test different pages.
Key Liquid Patterns and Objects to Use Inside Custom Liquid
- Global objects: Shop, cart, customer, product, collection. Use them only when available in the template context.
- Looping and conditions: Use for loops and if blocks to render lists, hide or show elements based on logic.
- Example:
{% for variant in product.variants %} {{ variant.title }} - {{ variant.price | money }}{% endfor %}
- Filters: Format text and numbers with filters like money, first, upcase, truncate, and JSON.
- Metafields: Access extra data with product.metafields.namespace.key and render custom content.
- Snippets and render: Include reusable markup with {% render 'snippet-name', var: value %} instead of the old include tag.
- App snippets: Insert app output by referencing the snippet the app provides or by asking the app to add a block.
Context Awareness and Safe Usage
Place code where the template context exposes the objects you reference. For example, product variables exist on product templates or sections added to product pages. Use conditional checks to avoid Liquid errors: {% if product %} {{ product.title }}{% endif %}
Sanitize any user-supplied output with filters and HTML escape when necessary. Avoid executing arbitrary scripts supplied by users. Test how the code behaves when objects are missing.
Editor Features and Schema Details
Use the section schema to expose settings in the theme editor. Setting type liquid gives a textarea that accepts Liquid and lets nontechnical staff edit content. Add text, select, and block settings to make the section configurable. Use presets to make the section available in the add section list.
Standard Sample Use Cases You Can Implement Quickly
- Show a custom sale badge driven by a product metafield.
- Output a personalized greeting for logged-in customers using customer.first_name.
- Render a collection grid with custom filters and a limit control.
- Insert app snippets for reviews or upsells inside a section controlled by the theme editor.
Each use case will require checking available objects and testing across templates.
Testing, Debugging, and Deployment Tips
Work on a duplicate theme to avoid disrupting the live store. Use the theme preview to test multiple templates and devices. Look for Liquid error messages in the editor or page source and check the server console for JS issues. Use version control or download theme files before significant changes.
Security and Performance Best Practices
Keep heavy loops and complex queries out of frequently rendered sections to avoid slow pages. Cache computed values in theme settings or metafields whenever possible. Escape user content and avoid injecting unsanitized HTML or script. When using app snippets, verify the snippet source and test for conflicts.
Troubleshooting Common Liquid Errors
- Undefined variable errors: Wrap access in an if check.
- Wrong context values: Confirm the section is placed on the correct template or pass objects into render calls.
- Slow rendering: Reduce nested loops and limit collection sizes or use paginated queries where needed.
Questions to Guide Your Customization
- Which template will host this code, and which Liquid objects must be available there?
- Do you need editor controls for nontechnical staff to change text or style?
- Will the code need to support different currencies or translated text?
Answering these will shape the structure and schema you add to the section.
What are the Sections and Blocks of Shopify Liquid?

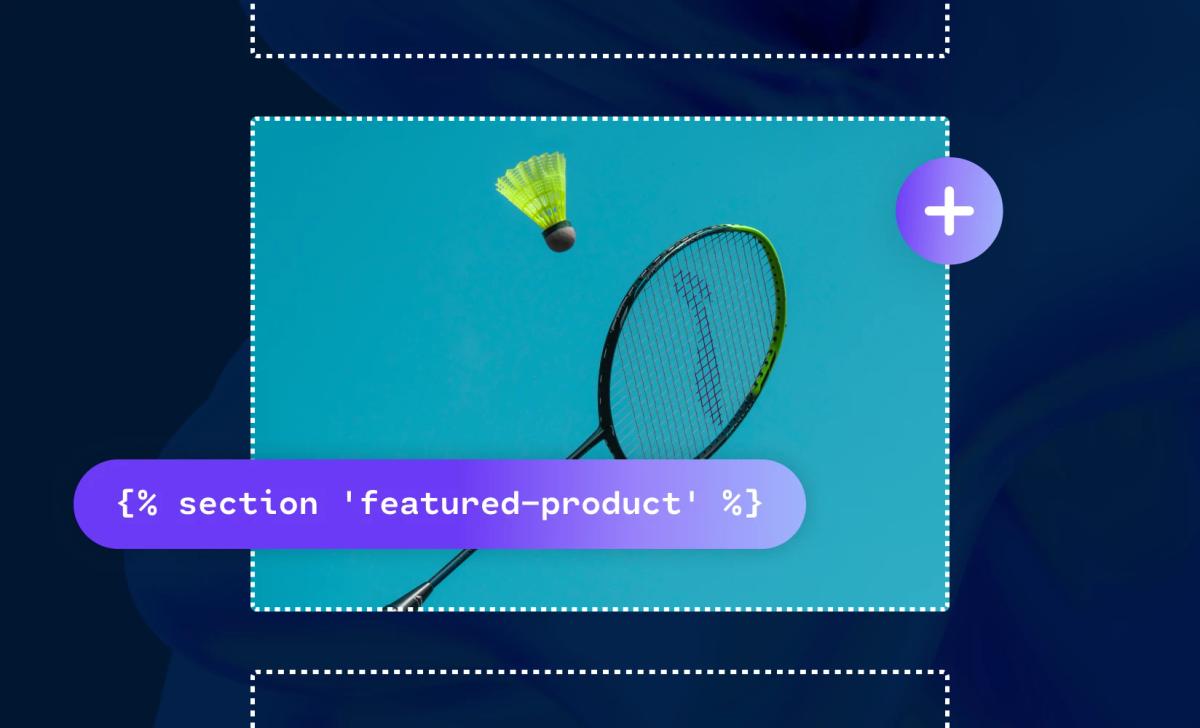
Sections are full-width containers that define major areas of a Shopify page, like a hero banner, product gallery, or footer. Each section lives in its own Liquid file and carries a schema object that exposes settings and blocks to the theme editor so merchants can change content without code. Themes include static sections that stay on every page, such as the header and footer, and dynamic sections that merchants can add or reorder on pages that allow them. Section files declare various settings types, including text, image_picker, richtext, product, collection, checkbox, and more, and provide presets to display ready-to-use blocks in the editor. In Shopify Online Store 2.0, JSON templates reference sections per template, and the section schema controls how the editor renders controls and available blocks.
Blocks: The Repeatable, Modular Pieces Inside a Section
Blocks live inside sections and supply repeatable content pieces like slides, testimonials, or feature cards. In the section schema, you define block types, each with its own settings, then loop through section.blocks in Liquid using code like {% for block in section.blocks %} to render each item. Each block exposes properties such as block.id, block.type, and block.settings so you can build conditional layouts or expose image and text fields to merchants. Blocks can be added, removed, and reordered in the theme editor, allowing merchants to manage lists of items without touching code.
How They Work Together: Building Pages with Schema-Driven Templates
A section provides the outer structure and settings, while blocks fill that structure with repeatable items; the theme editor reads the section schema and exposes both section-level settings and block controls.
Using Sections, Blocks, and Metafields in Shopify
Template files reference sections with the section tag or by JSON template definitions, and subsections of content render when you loop section.blocks in Liquid. Custom Liquid features enable store owners to add rendered Liquid snippets or simple HTML to a section when the theme exposes a custom Liquid block type. Additionally, metafields allow sections and blocks to pull product data, custom fields, or external values into the rendered output. When designing a new section, consider schema, defaults, and presets to ensure the theme editor displays predictable controls and allows merchants to reuse the section across templates.
AI Page Builder for Fast Product Testing
PagePilot’s AI page builder will help you test product ideas and angles much faster. Give our AI a competitor or supplier URL, and we’ll create a high-converting product page using content found on that site. We'll then use our AI Product Image function to upgrade product visuals, ensuring you don't compete with the exact copy and images as your competitor. Start a Free Trial and generate 3 product pages for free today, no credit card needed.
Related Reading
- Hire Someone to Build Shopify Store
- Shopify User Experience
- How to Add Products to Shopify
- How to Design Shopify Website
- How to Create a New Page Template in Shopify
- How to Create a Landing Page on Shopify
- Shopify Mobile Optimization
- How to Add a Review Section on Shopify
4 Best Custom Liquid Practices For Shopify

1. Start Small and Test Before Publishing: Make safe changes in Custom Liquid
Custom Liquid is Shopify s template language that lets you write Liquid tags, objects, filters, and variables inside a block in the theme editor. It renders dynamic content without editing core theme files. Begin with tiny edits so you can preview behavior and catch errors before they affect customers.
Try One Change at a Time
Edit a single text string, show or hide a block with a simple if condition, or add a single metafield output. Use the theme editor preview and check desktop and mobile views. Use a development theme or a duplicate of your live theme to avoid publishing breaking changes to customers. Use the Shopify CLI or a dev store when you need a controlled environment with version control.
Watch for Runtime Errors from Bad Liquid Syntax
Common safe patterns include assigning a variable once and reusing it instead of repeating complex filters, and using filters like | default: '' and | escape when output might be nil or user-generated. For example, {{ product.metafields.custom.badge | default: "" | escape }} prevents missing data from breaking the page.
2. Use Comments and Write Clean Code: Make Liquid readable and maintainable
Comment your work with Liquid comments so intent remains clear. Use {%- comment -%} explain why this block exists {%- endcomment -%} to annotate tricky logic. Name snippets and sections clearly, indent consistently, and split repeated UI blocks into snippets or render templates to reduce duplication and to keep the Liquid template logic simple. Prefer {% render 'product-card', product: product %} to older include patterns because render isolates scope and reduces side effects.
Limit Nesting and Complex Logic Inside Templates
Liquid is a template language, not a full programming language, so move heavy logic into apps, storefront scripts, or JavaScript when needed. Use filters efficiently. For example, avoid filtering the same value repeatedly; assign it once with {% assign price = product.price | divided_by: 100 %} then reuse price. Use JSON and URL-encode when you pass data into data attributes or JavaScript to avoid injection problems. Clear comments help future editors know why you chose the given filters or conditional checks.
3. Back Up Your Theme: Duplicate, version control, and test branches
Never edit a live theme without a fallback. Duplicate the theme in the Shopify admin before major edits and name duplicates with a date or version tag. For ongoing work, adopt Git backed workflows using Shopify CLI or GitHub integration so you can track commits, branch work, and roll back changes quickly. Create a dev store or use a theme preview URL for QA across devices and user roles.
Export the theme if you need an offline copy and document the change in your commit message or admin notes. When testing changes tied to Online Store 2.0 features, such as JSON templates or sections, ensure you test both published and preview modes, as rendering can differ between the live store and the editor. Keep backup routines repeatable and straightforward so you actually use them before risky edits.
4. Know When to Involve a Developer: Recognize Liquid s limits and risks
Custom Liquid and Shopify Liquid handle template rendering, variable output, and light conditional logic. They do not replace a backend or an app when you need API integrations, secure key handling, complex data aggregation, or heavy computation.
When to Involve a Developer in Shopify
Call a developer when you need a private app, GraphQL Admin or Storefront API work, server-side logic, or a custom storefront. Also, engage a developer for performance tuning if templates cause slow rendering:
- Reduce nested loops
- Add limits to collections
- Profile templates with real product data
Developers can implement caching patterns, move complex logic into app endpoints, and enforce accessibility and security best practices.
Start a FREE Trial and Generate 3 Product Pages with Our AI Page Builder Today
PagePilot uses AI to compress weeks of manual testing into hours. Feed it a product idea or a competitor URL, and the builder pulls structure, copy cues, and visual concepts so you can generate multiple product pages fast. You can spin up variants to A/B test headlines, descriptions, and trust elements without rewriting each page by hand.
Turn Any Competitor URL into a High-Conversion Product Page
Give PagePilot a supplier or competitor website, and the system extracts product copy, feature lists, spec points, and social proof patterns. The output is a ready product page that follows conversion best practices while avoiding copy duplication. The builder maps elements to Shopify product templates so the generated page fits into your storefront structure and page rendering pipeline.
Upgrade Product Images with AI That Stops Mirror Copying
PagePilot’s AI Product Image function remasters visuals to prevent your storefront from using the exact images your competitor uses. The tool can produce hero shots, lifestyle composites, and clean background packshots matched to your product attributes and brand tone. This reduces creative parity and gives you a fresh visual angle to test in ads and on product pages.
How PagePilot Speaks Shopify: Custom Liquid and Theme Files
PagePilot outputs pages ready for Shopify by mapping content into Liquid templates and sections. Suppose you use Custom Liquid or theme.liquid templates, the builder generates liquid snippets, objects, and metafield placeholders that the theme editor can render. That means dynamic content, such as variant pickers, price blocks, and inventory logic, comes through as Shopify Liquid code rather than static HTML.
Works with Sections, Blocks, Metafields, and App Blocks
The builder respects Shopify’s sections and blocks model, allowing you to edit the layout in the theme editor after import. Generated pages include metafield wiring for product specs and for any dynamic content you want to manage from the admin. If you use theme app extensions or app block patterns, PagePilot can place conversion modules where they belong without breaking template overrides.
Liquid Filters, Snippets, and Template Overrides Explained
When PagePilot writes Liquid code, it uses standard Liquid filters and objects so the output is compatible with Shopify rendering. Snippets hold reusable content like guarantee badges or feature lists. Template overrides let you test a new product template without touching your live product template, keeping store rendering predictable while you iterate.
Speed, Compliance, and Cleaner Testing Workflow
You keep control of assets and code. PagePilot provides export options, allowing you to review liquid files, image assets, and snippet placement before pushing to production. The workflow supports versioning and safe deployments to your theme, so tests run against the same storefront rendering engine your customers use.
Start a free trial, plug in a competitor URL, and generate three product pages with no credit card required.