
You've launched a store, and your product and about pages look like everyone else's, so you need a custom page template to stand out and convert visitors. Among the Best Shopify Page Builders, those that let you create and edit templates in the theme editor cut development time and give you control over sections, blocks, layout, and page template files. This article walks you step by step through how to create a new page template in Shopify, from naming the template and making the template file to adding sections, using JSON templates or Liquid snippets, and assigning the template to a page.
To speed that process, PagePilot offers an AI page builder that generates clean templates, suggests layouts, and fills sections and blocks for you. It lets you preview templates and assign them to pages without heavy coding so that you can focus on design and driving sales.
What are Page Templates in Shopify?
A page template controls the layout and presentation of pages across your online store. It sets where images, headings, text blocks, and buttons appear, which sections load, and which style rules apply. Every new page uses the theme default until you assign a different template or create a new one, you can then:
- Change layout
- Add or remove sections
- Expose custom blocks without touching product data
Open the theme editor to see which template a given page uses.
Standard Templates You Will Use Daily
- Home page: The primary landing page that highlights featured products, promotions, and collections.
- Collection pages: Group products by category, such as Summer Collection or Best Sellers.
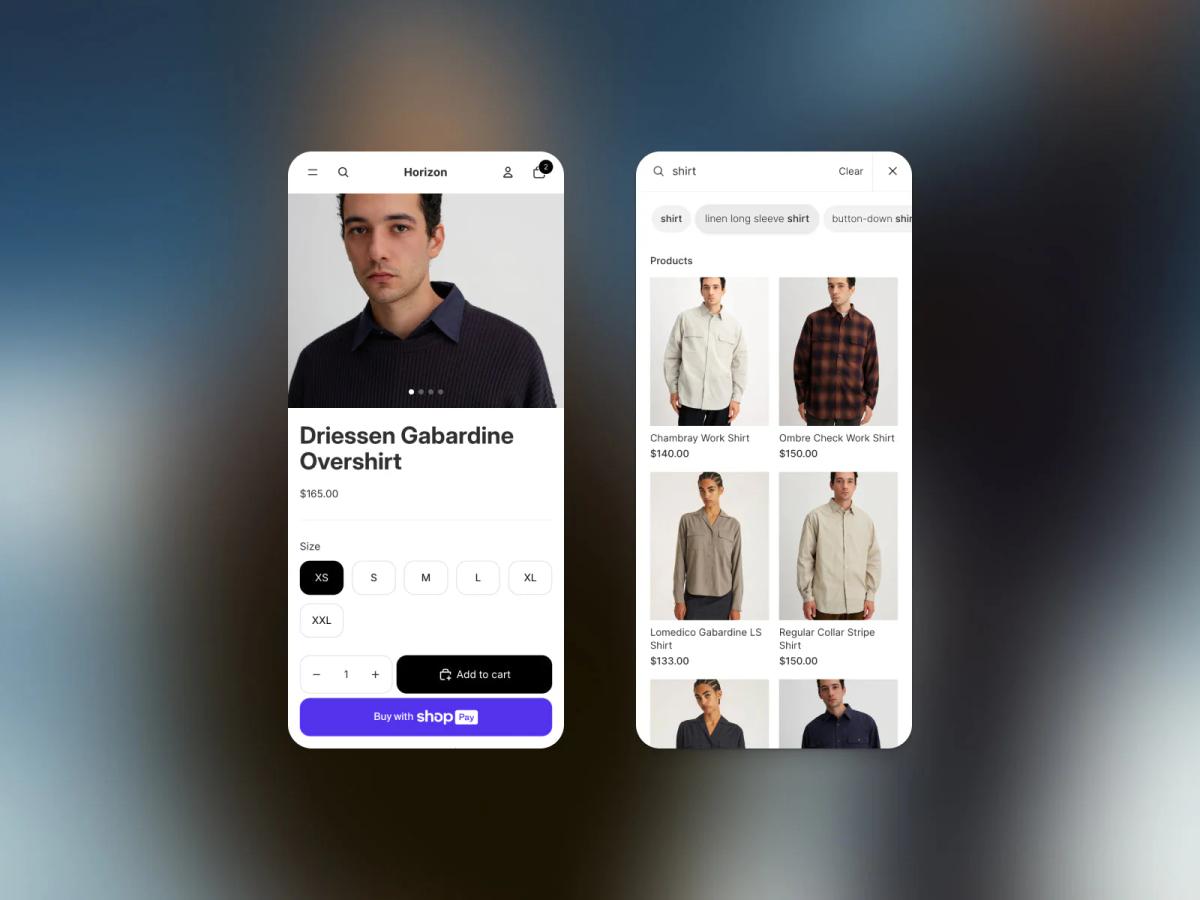
- Product pages: Display images, prices, variants, descriptions, and add-to-cart options.
- Blog and article pages: Host content marketing posts and updates.
- Custom pages: About Us, Contact, FAQ, and landing pages, all built from a unique template, ensuring the content appears correctly.
Which of these templates do you edit most often?
A Cost-Effective Starting Point
Building a website entirely from scratch can be prohibitively expensive, often ranging from $12,000 to $150,000, depending on design complexity and functionality. For small businesses and startups, that’s a significant investment before even selling a single product.
Affordable Efficiency
Shopify templates offer a far more affordable and efficient alternative. The platform offers a range of free themes, each featuring professionally designed layouts and built-in eCommerce functionality, enabling brands to launch quickly without incurring upfront development costs. Even Shopify’s premium themes which offer enhanced customisation and advanced design options, remain budget-friendly compared to custom web builds. For entrepreneurs seeking both professional design and cost control, Shopify templates strike the ideal balance: ready-made design flexibility without the financial burden of bespoke development.
How to Create a New Page Template in Shopify (Step-by-Step)
Get to the Theme Editor Fast
Open Shopify admin and go to Online Store → Themes. Click Customize to work visually, or choose Actions → Edit code to open the theme files and get direct access to templates and sections. Pick the route you want and proceed to the next step.
Spin Up a New Page Template
In the Edit code view, open the Templates folder and click Add a new template. Select 'Page' as the template type and give it a short, descriptive suffix, such as 'custom-about' or 'landing'. Shopify creates a file named page.custom-about.liquid (or page.custom-about.json for Online Store 2.0 themes) that becomes your custom template file.
Shape the Template with Liquid, HTML, or Sections
If you edit code, place Liquid tags and HTML where you want static content and include sections with {% section 'name' %} (Liquid) or use JSON template syntax for section blocks. For Online Store 2.0 themes, use JSON templates and reference section files in the Sections folder so the theme editor can expose those sections as editable blocks. Add markup, classes, and any CSS or script references you need to control layout and behavior.
Use the Theme Editor to Build Without Coding
Open Customize for the new template (choose the template dropdown and pick your page.custom-about template) to add sections, blocks, and reorder content visually. Add an image with text, a featured product, rich text, or a custom HTML section and configure settings for each block inside the editor. This makes it easy to change content, typography, spacing, and mobile display without touching Liquid.
Assign the Template to a Specific Page
Go to Online Store → Pages, open the page you want to change, and find the Theme template on the right. Select your new template from the dropdown (for example, page.custom-about) and click Save to apply that layout to the page. After assigning, open that page in the Customize editor to tweak sections and content live.
Use Dynamic Sections and Reusable Blocks in Online Store 2.0
For modern themes, build section files with a schema so merchants can add and configure them per page from the Customize interface. Create section files that accept blocks like:
- Text
- Images
- Product lists
- Testimonials
Refer to those sections in the page JSON template to allow editors to add multiple instances or reorder them. Test each section’s settings and ensure the schema exposes the controls you want in the theme editor.
Preview on Devices and Iterate Quickly
Preview the page on desktop and mobile, check links and buttons, and verify responsive images and spacing. If something breaks, switch to Edit code to fix Liquid, CSS, or JavaScript, or adjust section settings inside Customize to see the changes immediately. Repeat user testing until the layout looks and performs the way you want.
Accelerate Product Page Creation
Want to move faster with product pages? PagePilot’s AI page builder will help you test products,
ideas, and angles much quicker—give our AI a competitor or supplier URL and it creates a high-converting product page using that site’s information. Our AI Product Image tool enhances visuals, enabling you to differentiate yourself from your competitors by avoiding exact copy and stock images. Start a FREE trial and generate 3 product pages for free today (no credit card needed).
Related Reading
- Does Shopify Host Websites
- Is It Worth Buying a Prebuilt Shopify Store
- How Much Does It Cost to Build a Shopify Website
- Shopify Product Page Customization
- What is Custom Liquid Shopify
- How to Customize a Shopify Website
- Shopify Speed Optimization
4 Tips for Maintaining Custom Templates in Shopify
1. Backup First: Duplicate Your Live Theme Before Editing
Before creating or editing a custom page template, duplicate the live theme in Shopify. Go to Online Store → Themes → Actions → Duplicate. That duplicate becomes your playground for:
- Creating a new page template
- Editing Liquid or JSON template files
- Testing sections and blocks without any risk to the live site
Use that copy to try changes to templates page.about-brand.liquid or page.about-brand.json and to add new sections like section.featured-collection.liquid.
Theme Backup and Rollback
If an experiment breaks layout or app integrations, you can republish the original theme or restore files from the duplicate. Do you use a developer workflow? Also, keep a parallel backup outside Shopify by exporting theme files or using Git with Shopify CLI or Theme Kit to track changes and roll back specific commits.
2. Clear Names and Consistent Section Structure
Create descriptive template and section names and keep a consistent folder layout. Use names such as page.about-brand.liquid or page.about-brand.json and section.featured-collection.liquid. For Online Store 2.0 themes, prefer JSON templates for page structure and separate sections for reusable blocks.
Liquid Code Organization Rules
Put a short comment at the top of each Liquid file that states the template's purpose, where it is applied, and any required metafields or app hooks. Follow the same naming pattern across pages, product, and collection templates so the team can guess locations fast.
- Keep component logic in snippets.
- Avoid copying the same code into multiple templates
- Centralize style rules in the theme stylesheet to reduce duplication and future merge conflicts.
3. Test on Mobile and Desktop for Responsive Performance
After adding or changing a template, preview the theme across devices and breakpoints. Use Shopify Theme Preview and your browser's responsive mode to check:
- Text sizes
- Image cropping
- Button visibility
- Touch targets
- Load order
Test actual phones and tablets when possible to confirm performance and that images use the correct srcset.
Post-Change Template Verification
Verify that call-to-action buttons sit above the fold on smaller screens and that blocks collapse cleanly when sections are removed. Run Lighthouse or similar audits to check for accessibility and performance regressions after template changes. If you change Liquid rendering or add heavy scripts, test with slow network throttling to see how the page loads for real shoppers.
4. Document Template Usage for Team Members or Future Developers
Record template intent, where templates are assigned, required metafields, and any app integrations. Keep a simple README file inside the theme code folder and a living document in a shared location, such as Notion or Google Drive. At the top of each Liquid or JSON template, add a short header comment with these items.
- Template name and template suffix are used to assign the template in Online Store Pages.
- Page types or individual pages that should use it.
- Required metafields and their namespaces.
- Apps or scripts that interact with the template.
- Last edited date and author.
Shopify New Page Template Workflow
Log the process to create a new page template in Shopify so team members can repeat it: duplicate theme, Edit code, Add new template, select page, and give a suffix, add or assign sections or blocks, save, then assign the template to a Page in Online Store → Pages by changing the Template suffix. Keep a changelog of commits or theme publishes and tag releases so you can identify when a template change introduced a bug.
- Hire Someone to Build Shopify Store
- Shopify User Experience
- How to Add Products to Shopif
- How to Design Shopify Website
- Shopify Mobile Optimization
- How to Create a Landing Page on Shopify
- How to Create a New Page Template in Shopify
4 Common Mistakes to Avoid When Creating Custom Templates in Shopify

1. Lock the Foundation: Don’t Edit the Default page.json Directly
When you change page.json or page.liquid, you change the default template that every page uses. That means a single tweak can ripple across product pages, collection pages, and any custom page that falls back to the standard template.
Safe Template Creation Practice
Create a new JSON template instead, for example, page.custom-about.json, or use the theme code editor to add a new template so your changes apply only where you intend. Check the template suffix and the JSON template schema to ensure sections and blocks render correctly. Then, test the new file in the theme preview before publishing it.
2. Assign It Properly: Don’t Forget to Pick the Template in Admin
After you create a template, it will not apply automatically. Go to Online Store → Pages → select the page → Template section, or open Customize in the theme editor, select the page from the top bar, and change the template from the Template picker. For product templates use Products → [Product] → Theme template, and for collections, use Collections → [Collection] → Theme template. If you skip this step, your new page.custom-*.json will sit unused in the code until you explicitly assign it.
3. Make It Flexible: Avoid Hardcoding Static Elements
Hardcoding text, images, or layout blocks locks out editors and prevents quick iteration in the visual theme editor. Use JSON template settings, sections, and blocks, and Shopify metafields so non-developers can:
- Swap copy
- Replace images
- Rearrange sections without touching Liquid
Prioritize Dynamic Data and Reusability
Prefer dynamic data sources, such as product title, product description, and metafield values, over embedded text strings. Build reusable sections and provide them with configurable blocks, allowing your team to test different hero images, CTAs, and layouts from Customize.
4. Protect Your Work: Don’t Let Theme Updates Overwrite Custom Files
Theme updates can replace files and erase changes if you modify core theme templates without a workflow. Use version control with Git, work in a staging environment, and deploy with Shopify CLI or Theme Kit to ensure safe merging of updates.
- Keep a backup copy of the original files
- Document every change with clear commit messages.
- Consider moving functionality into theme app extensions or app blocks so updates affect fewer custom files.
When an official theme update arrives, merge carefully rather than replacing your customized files outright.
AI for Unique, Fast Product Pages
PagePilot built an AI page builder that helps you test products, ideas, and angles much faster — give our AI a competitor or supplier URL. We’ll create a high-converting product page using the information found on that site and upgrade product visuals with our AI Product Image function, so you can stop competing with exact copy and images. Start a FREE Trial and generate 3 product pages for free today, no credit card needed.
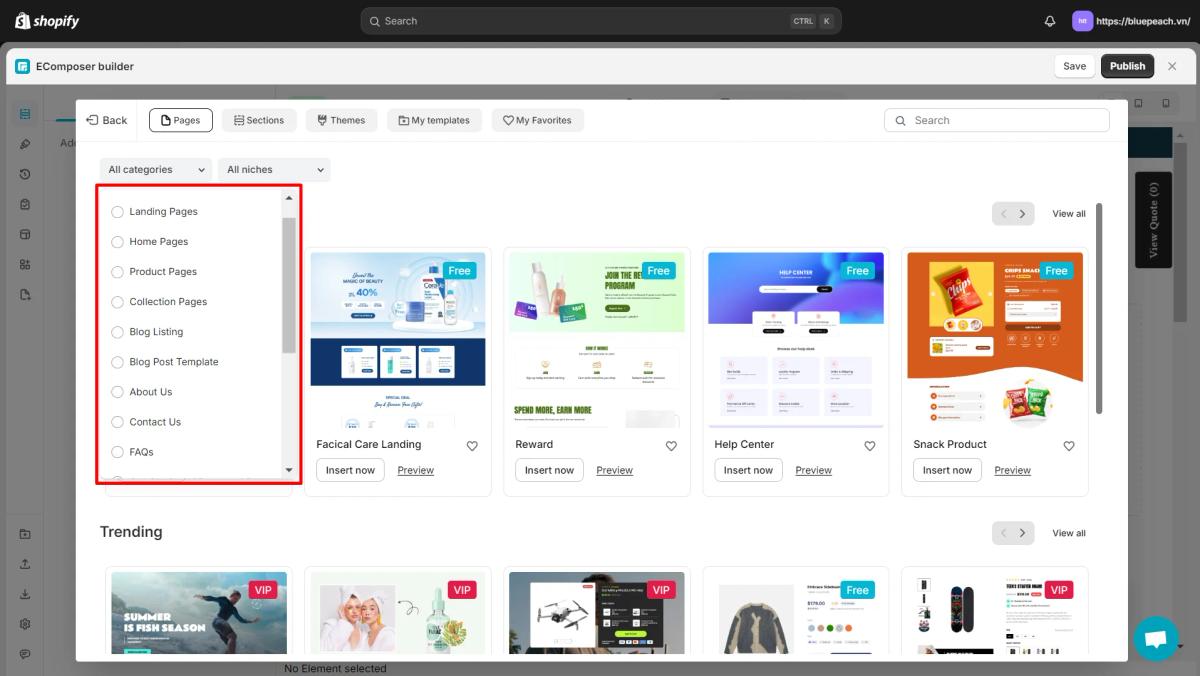
Using Apps to Create a New Page Template in Shopify
Shopify’s Online Store 2.0 editor uses sections and blocks to edit pages inside your theme. That system works well for standard pages and quick edits, but it limits advanced layout control and creative freedom. Page builder apps provide a visual canvas with drag-and-drop controls, responsive layout grids, and widgets that the native editor does not offer. They enable you to build landing pages, custom product pages, and campaign pages more quickly, while still maintaining a connection to your theme and Shopify data sources.
What Page Builder Apps Actually Let You Do: Capabilities List
- Create new templates from scratch with a visual drag-and-drop editor.
- Add animations, countdown timers, tabs, carousels, and advanced layout grids.
- Pull product content, collection data, and metafields into blocks for dynamic templates.
- Preview changes in real-time and toggle between device views for desktop, tablet, and mobile.
- Duplicate templates and reuse sections to keep a consistent design system.
- Export or sync templates to your theme as JSON templates or app blocks when supported.
- Manage SEO fields, schema, and metadata for each page using the builder.
- Run A/B tests and measure performance when the app includes experimentation tools.
Step by Step: How to Create a New Page Template in Shopify Using an App
- Install the page builder app from the Shopify App Store and grant the requested theme permissions.
- Open the app and select "Create new template" or "Create new page." Choose whether the template is a product page, a standard page, or a landing page.
- Use the visual editor to add hero images, product blocks, testimonials, FAQs, and call-to-action buttons. Connect each block to product fields, collections, or metafields to make the template dynamic.
- Set responsive rules and fine-tune spacing and typography for desktop, tablet, and mobile views.
- Save and preview the template inside the app. Many apps will let you publish or sync the template back to the theme, where it appears as a JSON template or an app-provided block.
- Assign the new template to a specific product or page from that item’s Template selector in Shopify admin or by linking the app-created URL. Test the live page and check analytics and page speed.
How Apps Connect to Themes and What That Means Technically
Online Store 2.0 uses JSON templates and sections to power flexible pages. Page builder apps either:
- Create theme JSON templates
- Inject app blocks into sections
- Host pages on an app subdomain using proxy routes
Understanding Page Builder App Architectures
Apps that write JSON templates place files in templates and sections folders so you can assign templates from Shopify admin. App block-based builders keep the content inside the app while rendering through the theme, which can simplify updates. Hosted pages via app proxies sit outside the theme and may require additional SEO and analytics checks. Always confirm how an app stores templates before you build an extensive library.
PagePilot: An Example of AI-Driven Template Creation
PagePilot can generate product pages from a competitor or supplier URL by extracting product copy, images, and structure, then building an optimized layout automatically. It also offers automatic image upgrades, so your product galleries stand out from other stores using the same stock images. You can spin up multiple page versions quickly to test different messaging and creative angles, then iterate using analytics and conversion data.
Best Practices When Building Templates with an App
- Start with a master template and clone it for different campaign needs to keep brand and UX consistency.
- Utilize dynamic sources and metafields to ensure the same template works across multiple products without requiring manual edits.
- Optimize images before upload and use lazy loading where available to improve page speed.
- Limit third-party scripts and heavy animations on product pages that drive organic traffic.
- Version your templates and keep a backup of your theme before syncing the created templates to the live theme.
- Run device and speed tests after publishing and track revenue impact when you run A/B tests.
When a Page Builder App is Not the Right Tool
If you require in-depth custom logic tied to Shopify Functions or a bespoke checkout flow, a developer built with custom Liquid and app extensions may be a better option. If you must meet strict performance budgets and want minimal external scripts, a hand coded template will produce the lightest output. Use apps for marketing pages, landing pages, and rapid product page experiments while reserving developer time for complex integrations.
Questions to Help Decide Which Pages to Build with an App
- Which pages require rapid iteration and frequent updates?
- Will the page use dynamic product data or unique metafields?
- Do you need built-in A/B testing or analytics inside the builder?
- An
- swer these questions and choose the tool that strikes a balance between speed and long-term maintainability.
Related Reading
- Hire Someone to Build Shopify Store
- Shopify User Experience
- How to Add Products to Shopify
- How to Design Shopify Website
- How to Create a Landing Page on Shopify
- Shopify Mobile Optimization
- How to Add a Review Section on Shopify
Start a FREE Trial and Generate 3 Product Pages with Our AI Page Builder Today
Give PagePilot a competitor or supplier URL and our AI scrapes headlines, features, specs, and social proof. Then it maps that content into a conversion-focused layout. You get a ready product page that tests different angles faster than manual copywriting and design. Want to test price points, headlines, or target audiences quickly — which one do you try first?
Turn Any URL into a Ready Product Page: Fast
Paste the competitor link, pick a template, and let the AI extract product benefits, bullet points, and trust elements. PagePilot reconstructs structure and tone, then fills in:
- High-converting headline
- Benefit bullets
- CTAs
You can edit text, swap blocks, or run an A/B test directly from the builder. Which part of the page do you want to tweak first?
AI Product Image: Upgrade Visuals and Stop Copying Competitors
PagePilot’s AI Product Image tool reworks visuals so you no longer use the same photos or generic angles as the supplier. It generates:
- New product shots
- Lifestyle edits
- Background removals
- Clean mockups that match your brand
Upload your images or let the AI create fresh artwork automatically. Ready to replace tired photos with unique visuals?
Start a FREE Trial: Generate Three Product Pages, No Card
Sign up and generate three product pages at no cost. No credit card needed. You can export pages, clone them, and compare performance across traffic sources. The trial gives hands-on experience with:
- Content scraping
- Layout swaps
- Image upgrades
Which product will you test first?
How to Create a New Page Template in Shopify: Quick Action Steps
Want a custom page template to match your PagePilot designs? Open Shopify admin, go to Online Store > Themes, click Actions > Edit code. Under the templates folder, choose Add a new template, select page and pick JSON for Shopify 2.0 themes or Liquid for legacy themes, then give the template a name. Do you prefer JSON templates so you can use sections per page?
Create a JSON Template in Shopify 2.0: Exact Steps
In the code editor, pick Add a new template, choose page, and select JSON. Name it like page.productpilot. Shopify creates templates/page.productpilot.json. Add section references or blocks inside that JSON file, and then create matching section files in the sections folder if needed. Use the sections schema to expose editable blocks in the theme editor. Which sections will feature your hero, key points, and gallery?
Create a Liquid Template for Older Themes: Short How To
If your theme uses Liquid, add a new template named page.productpilot.liquid. Duplicate content from page.liquid or another template, and place custom markup or include snippets. Edit the template to reference snippets and CSS classes that match your design. Want the hero to behave differently from the default page?
Assign the New Template to a Shopify Page
Open Shopify admin > Online Store > Pages. Edit the page you want to use, then select Theme template and choose page.productpilot. Save the page and preview it on the storefront. If you do not see the template, confirm the file naming and refresh the theme editor. Ready to preview on desktop and mobile?
Edit Sections, Use Metafields, and Make Templates Dynamic
Create or modify sections in the sections folder to build modular content: hero, features, reviews, FAQ, and gallery. Add schema settings so merchants can change images, text, and layout via the theme editor. Use metafields to store product-specific copy, technical specifications, or custom badges, and expose them in templates using Liquid queries or JSON rendering. Which metafields will drive personalization for your products?
Duplicate, Version, and Test Template Variants
Duplicate an existing template file to create A and B versions: page.productpilot_v1.json and page.productpilot_v2.json.
- Swap headlines
- Reorder sections
- Change image layouts between versions
Assign them to separate pages or use URL redirects to test performance. Track conversion metrics and iterate on the higher-performing variant to optimize results. What metric will determine a win for you?
Practical Workflow: From PagePilot Output to Shopify Live Page
Export the PagePilot HTML or copy the content blocks, then build matching sections and templates in your Shopify theme. Replace placeholder images with PagePilot AI Product Image assets and map product copy to metafields. Preview in the theme editor, QA across devices, then publish. How fast can you move from idea to live test this week?